In this blog, we shall visit the new functionality of Vendor Invoice automation in D365 Finance and try and figure out new features that are available.
Organizations that want to streamline their Accounts payable (AP) processes often identify invoice processing as one of the top process areas that should be more efficient. In many cases, these organizations offload the processing of paper invoices to a third-party optical character recognition (OCR) service provider. They then receive machine-readable invoice metadata together with a scanned image of each invoice. To help with automation, a “last mile” solution is then built to enable consumption of these artefacts in the invoicing system. Now this “last mile” automation is enabled out of the box, through an invoice automation solution.
Solution context
The invoice automation solution in D365 Finance enables a standard interface that can accept invoice metadata for the invoice header and invoice lines, and also attachments that are applicable to the invoice. Any external system that can generate artefacts that comply with this interface will be able to send the feed for automatic processing of invoices and attachments.
Vendors send invoices to the service provider by email. Through OCR processing, the service provider generates invoice metadata (header and/or lines) and a scanned image of the invoice. An integration layer then transforms these artefacts, so that they can be consumed.
Overview
With Dynamics 365 Finance – Accounts Payable – Invoice Automation, we can
- Automatically submit imported invoices to workflow,
- Automatically match product receipts depending vendor invoice lines,
- Simulate posting prior to posting the vendor invoice.
Further, key features include viewing workflow history and support to analyze the results of the straight through process by tracking key metrics, such as:
- The touchless rate,
- Days to process invoice,
- Assignment per approver.
We can enable the vendor invoice automation feature in the Feature Management workspace – Searching All and typing Automate to access the Accounts Payable module.
Setup
We can set up the workflow from the Accounts Payable Workflow area and select Vendor Invoice Workflow. To have a truly touchless scenario, we should have an automated posting element in our workflow – either the Post Invoice or the Post Invoice using a batch element.

Then we set up parameters in the Accounts payable parameters page and select Vendor invoice automation from the sidebar.
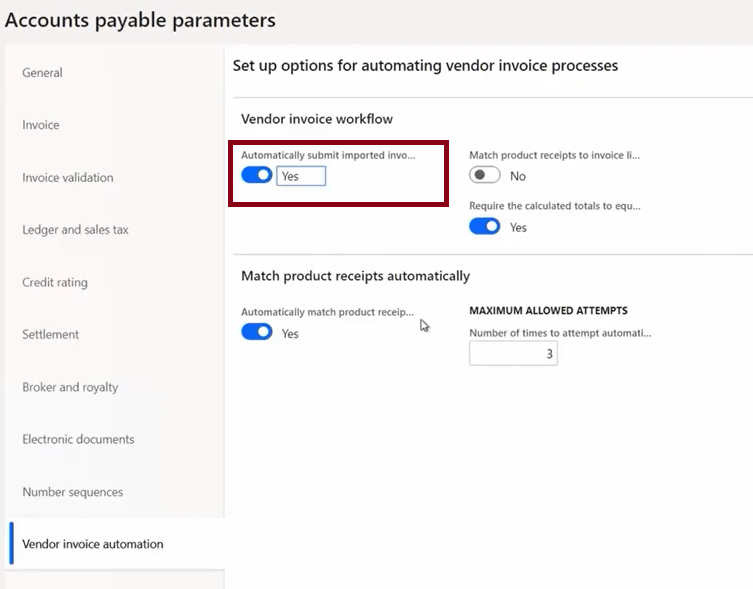
In this feature, users can automatically submit imported invoices to the workflow for approval. This is enabling a background task that processes incoming imported invoices which you can configure to run using a daily or hourly frequency. We can also configure, other tasks validations that need to be run prior to the automatic workflow submission. We can opt in, to require that the system matches our product receipts to invoice lines prior to running this admission process. Another cost and labour-saving feature is the automated Match Product receipt to Invoice lines process. After, entering invoices into the system, it automatically processes the incoming Product receipts and matches them to previously saved invoices, eliminating the need to monitor the arrival of goods manually.

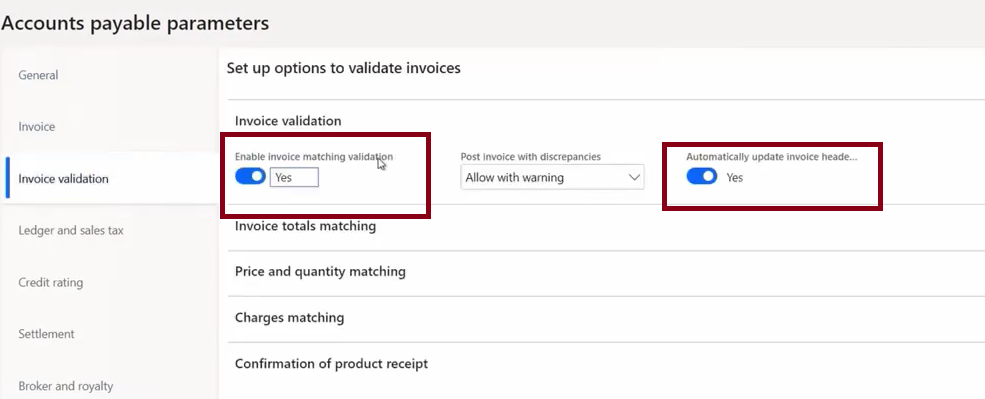
It can be configured to run using a daily or hourly frequency and it can be included as part of the auto submission process. When using this function, we need to make sure that invoice matching validation is enabled and that the system is automatically updating the invoice header match status as well.
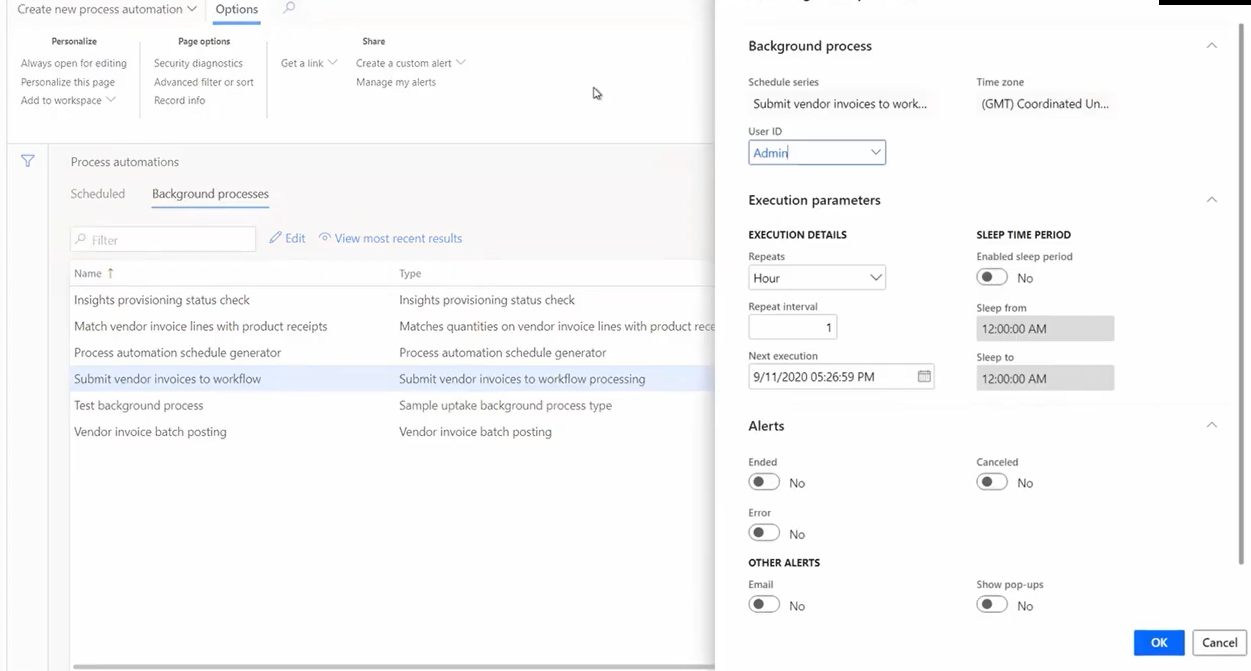
We complete set up in the background processes by going to the process automation area of systems administration (System administration > Process automations). For example, let’s look at Submit Vendor invoices to the workflow, we have access to the User ID, we can set alerts and manage execution details:
- such as the frequency the process will be run,
- the user ID will be used, as the submitter value, by the workflow process.
To see the results, we go to
Accounts payable > Vendor invoice entry (Workspace)
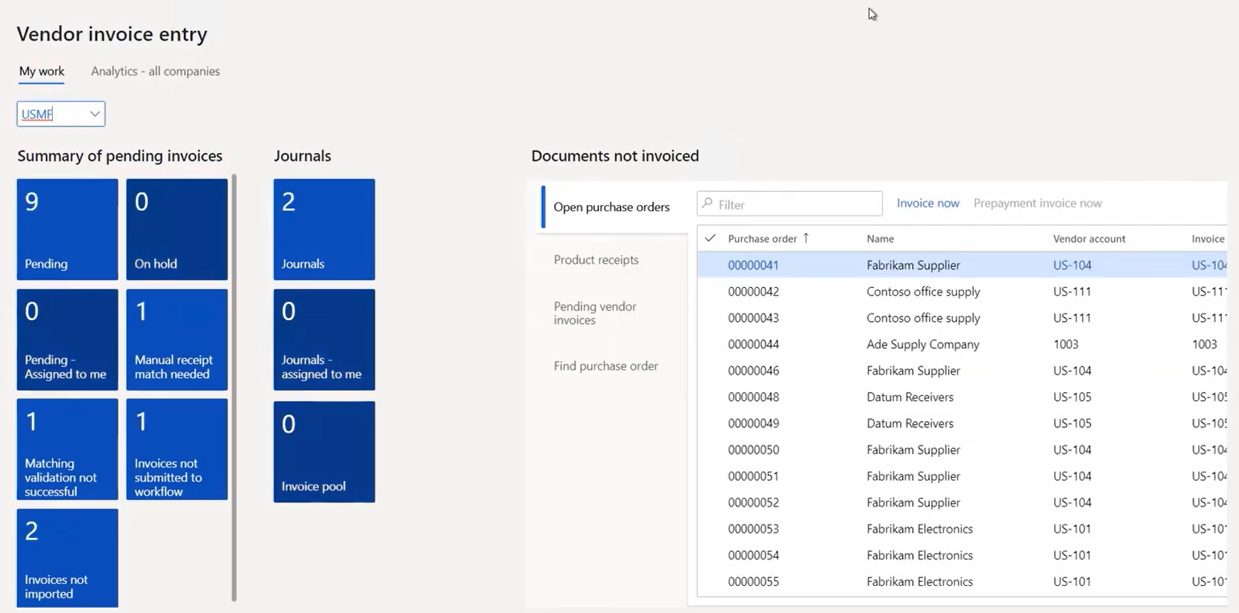
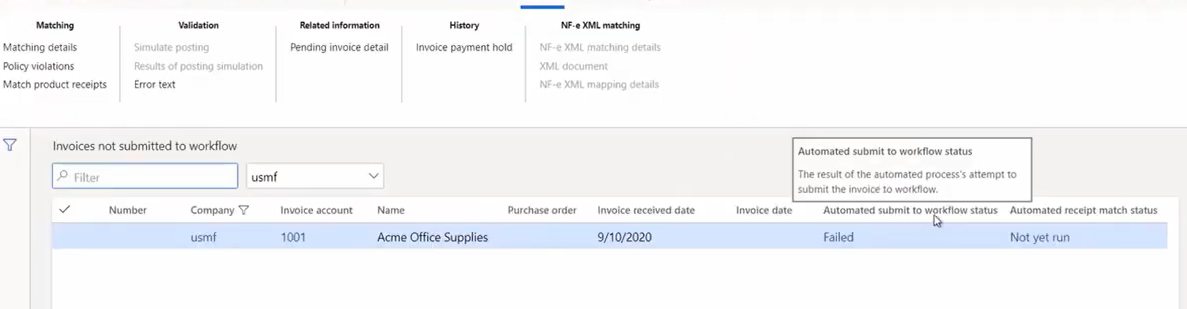
This workspace provides insight into the invoices that didn’t make it through the automated process successfully. The automated vendor invoice feature allows us to focus on the items that need attention such as invoices not submitted to workflow or invoices that have not been imported.
By selecting the tile “Invoices not submitted to the workflow”, we gain insight into the invoices not submitted, including the automated submit to workflow status as well as the automated Receipt match status.
By selecting the invoice that failed, we received the error message letting us know ‘the invoice number must be specified’.
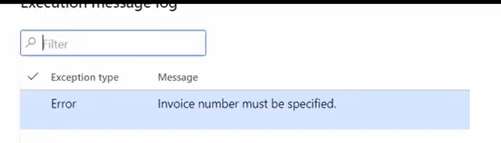
In this case, the Accounts Payable clerk could go back to the list page and enter in the invoice number, or they could drill back into more detail.
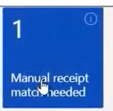
Under manual receipt match, we can identify that this item has reached the maximum number of matching attempts.


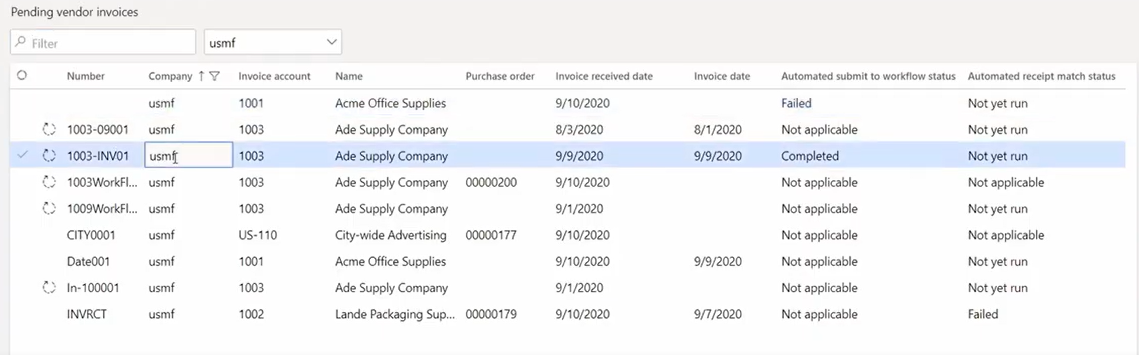
User may want to review the automation status of a pending invoice
By selecting, we see the details of the invoice. This one is in the workflow step of the automatic submit to workflow status.
On the analytics page and workspace, you can see the efficiencies of your automation efforts. This workspace gives you a view across all the companies you may be managing. Notice key metrics such as the Touchless invoice, the Last 30 days and Days to process an invoice.
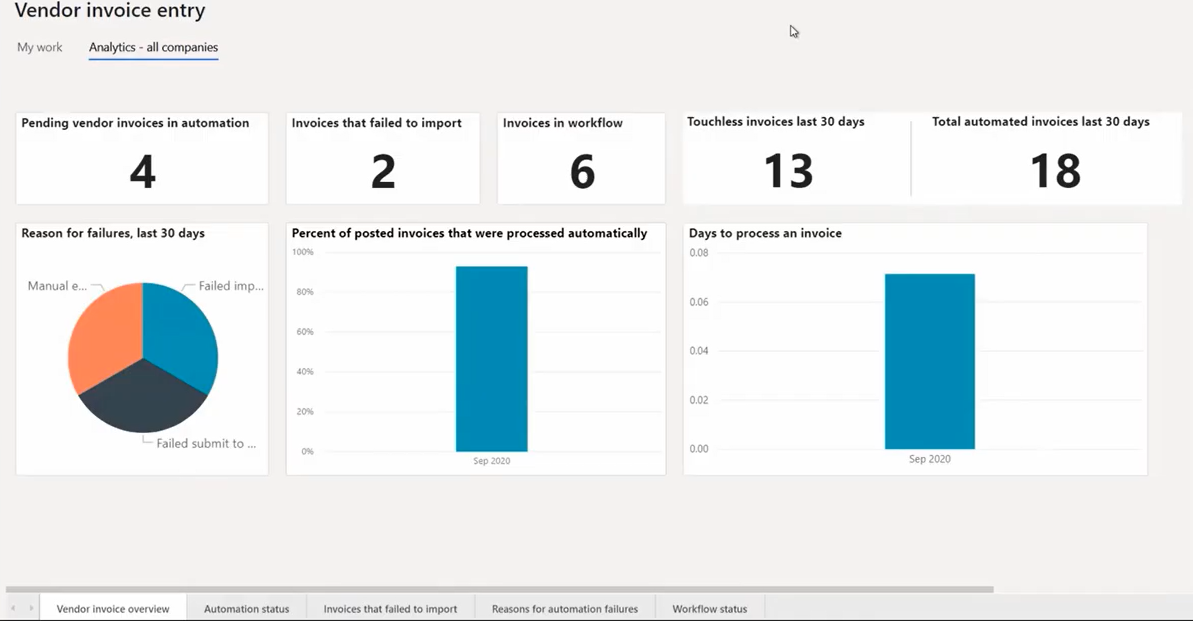
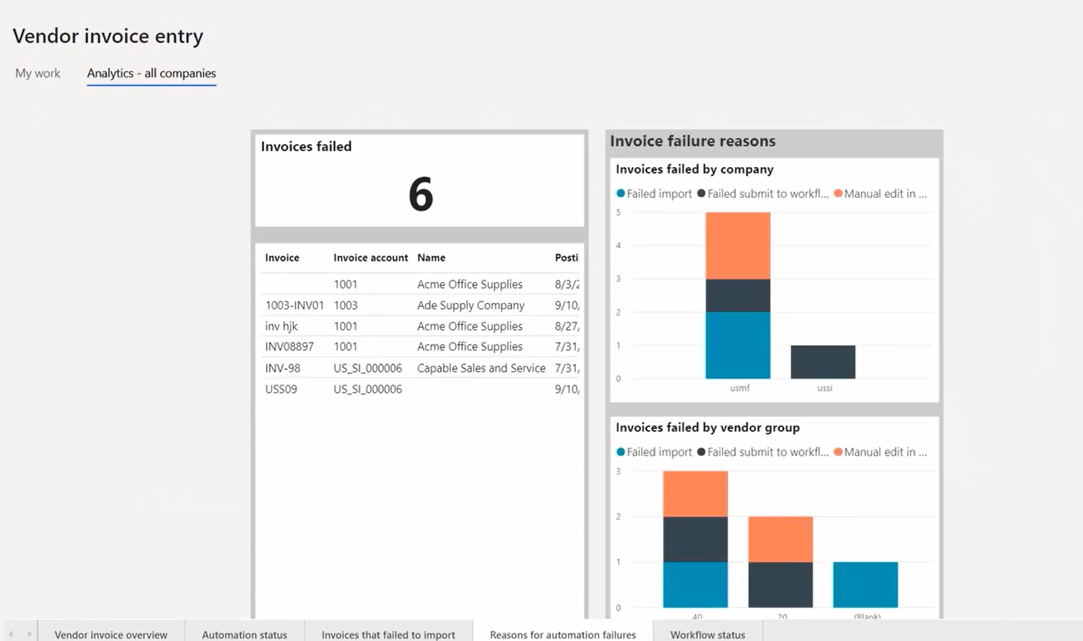
From here, we gain valuable business insights data such as the number of failed invoices, the vendor, supplier name, etc are present. To the right are grids that provide greater detail.
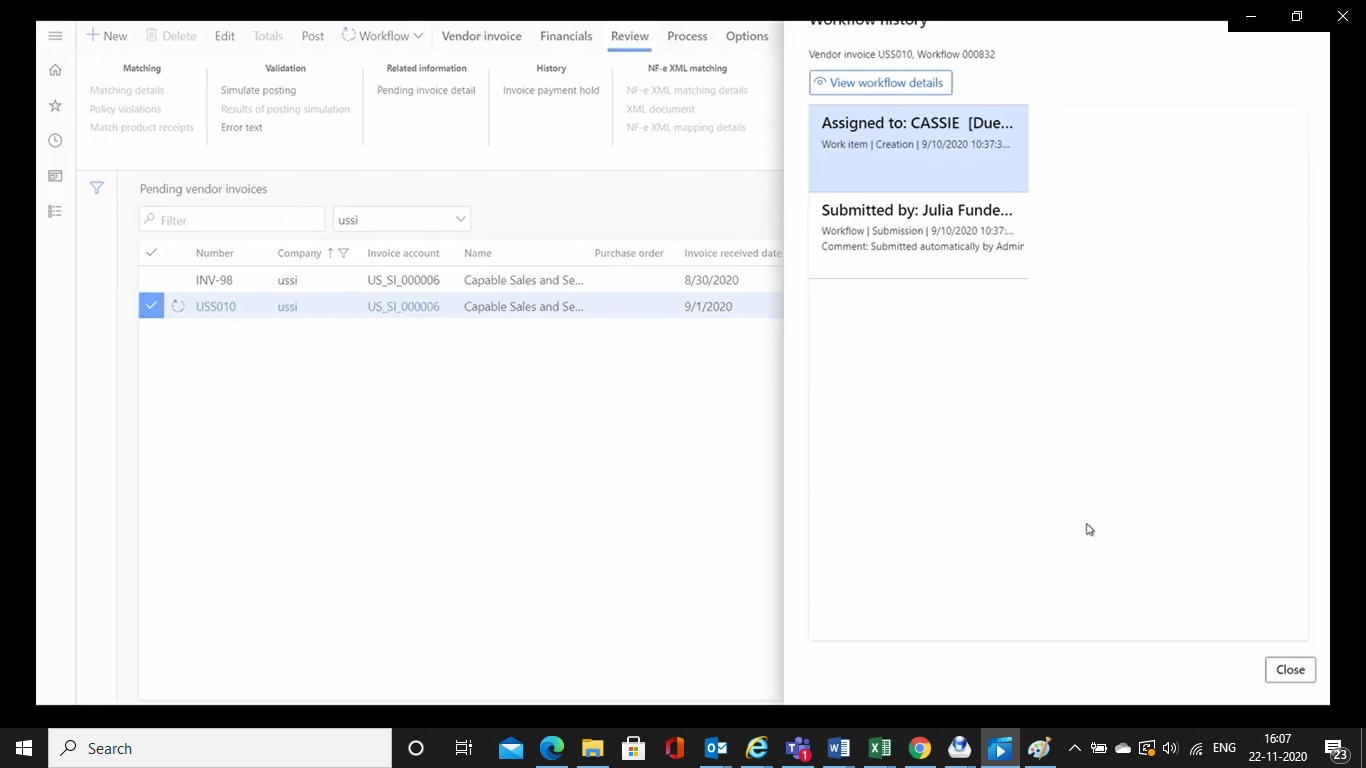
Another key feature is the enhanced workflow – we can go and select Legal entity from the company selector. Further, look at this pending invoice form, the enhanced workflow history help speed up decision making by illuminating the need to search for information. A simplified view, shows the history in reverse chronological order of the steps in workflow that this invoice has gone through.
For example, the approver can quickly access the workflow history and see the employee responsible for this invoice.
The final feature we will cover is Simulate Posting in Accounts Payable. Clerks can fix any data errors before submitting into the workflow for approval or posting it, ensuring accuracy and saving time.
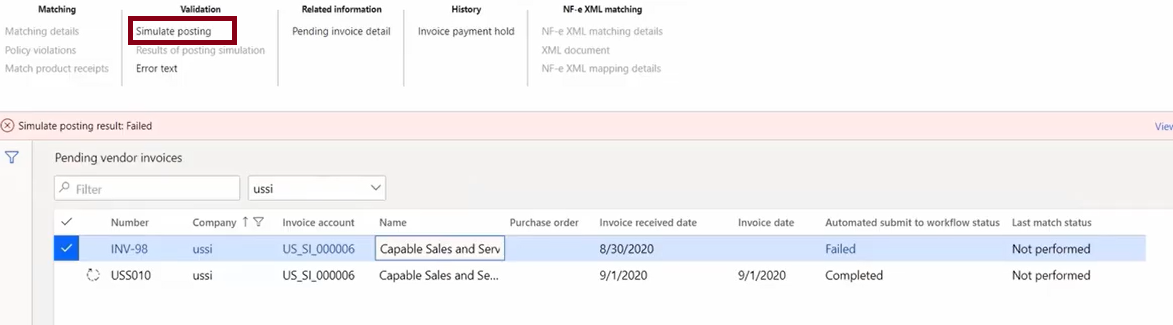
When we select Simulate Posting, simulation of posting completes the validation steps that are done during the posting process for vendor invoices without updating any accounting.
In the pink bar, the simulate posting result indicates failed, so we know an error exists that needs fixing. Prior to posting, we can assess that an issue exists with the accounting and which distribution had the issue.
For more information for D365 Finance Vendor Invoice automation, I suggest you may visit this link